Friday, April 22, 2011

IPv6 - 6to4 Tunnels using IPv4 EIGRP routes


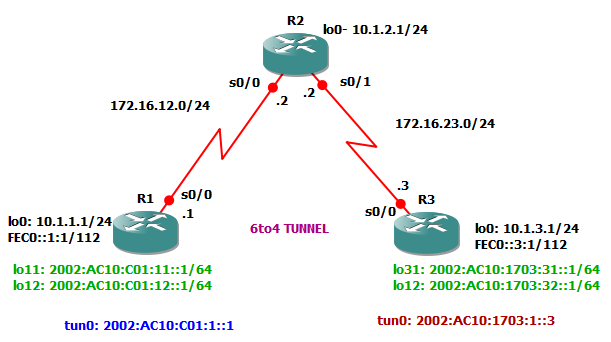
In this lab, configure all routers with IPV6 and IPV4 addresses and establish communication between R1 and R3 using IPv6to4 tunnelling.

Objectives are as follows;
(1) Configure EIGRP for IPV4.
(2) Create a 6to4 tunneling
(3) Configure static IPv6 routes.


In R1, configure the following configurations for tunnelling.

interface Tunnel0
 no ip address
 no ip redirects
 ipv6 address 2002:AC10:C01:1::1/64
 tunnel source Serial0/0
 tunnel mode ipv6ip 6to4


For IPv6 routing,

ipv6 unicast-routing
ipv6 route 2002::/16 Tunnel0
ipv6 route FEC0::3:0/112 2002:AC10:1703:1::3

Enabling simple EIGRP routing for IPv4 networks are as follow;

router eigrp 1
 network 10.0.0.0
 network 172.16.0.0
 no auto-summary
-------------
Result of routing in R1 are as follow;

R1#sh ipv6 route
IPv6 Routing Table - 12 entries
Codes: C - Connected, L - Local, S - Static, R - RIP, B - BGP
       U - Per-user Static route
       I1 - ISIS L1, I2 - ISIS L2, IA - ISIS interarea, IS - ISIS summary
       O - OSPF intra, OI - OSPF inter, OE1 - OSPF ext 1, OE2 - OSPF ext 2
       ON1 - OSPF NSSA ext 1, ON2 - OSPF NSSA ext 2
S   2002::/16 [1/0]
     via ::, Tunnel0
C   2002:AC10:C01:1::/64 [0/0]
     via ::, Tunnel0
L   2002:AC10:C01:1::1/128 [0/0]
     via ::, Tunnel0
C   2002:AC10:C01:11::/64 [0/0]
     via ::, Loopback11
L   2002:AC10:C01:11::1/128 [0/0]
     via ::, Loopback11
C   2002:AC10:C01:12::/64 [0/0]
     via ::, Loopback12
L   2002:AC10:C01:12::1/128 [0/0]
     via ::, Loopback12
L   FE80::/10 [0/0]
     via ::, Null0
C   FEC0::1:0/112 [0/0]
     via ::, Loopback0
L   FEC0::1:1/128 [0/0]
     via ::, Loopback0
S   FEC0::3:0/112 [1/0]
     via 2002:AC10:1703:1::3
L   FF00::/8 [0/0]
     via ::, Null0


-------------------------------------------
R1's IPV6 addressing are as follows;

R1#sh ipv6 int brief
Serial0/0                  [up/up]
Serial0/1                  [administratively down/down]
Serial0/2                  [administratively down/down]
Serial0/3                  [administratively down/down]
Loopback0                  [up/up]
    FE80::9CD7:2EFF:FEF0:99FA
    FEC0::1:1
Loopback9                  [up/up]
Loopback11                 [up/up]
    FE80::9CD7:2EFF:FEF0:99FA
    2002:AC10:C01:11::1
Loopback12                 [up/up]
    FE80::9CD7:2EFF:FEF0:99FA
    2002:AC10:C01:12::1
Tunnel0                    [up/up]
    FE80::AC10:C01
    2002:AC10:C01:1::1
----------------------------------------------------------------------------
In R3, 

Enabling for tunnelling are as follows;

ipv6 unicast-routing
 ipv6 address FEC0::3:1/112
 ipv6 address 2002:AC10:1703:31::1/64
 ipv6 address 2002:AC10:1703:32::1/64
 ipv6 address 2002:AC10:1703:1::3/64
 tunnel mode ipv6ip 6to4
ipv6 route 2002::/16 Tunnel0
ipv6 route FEC0::1:0/112 2002:AC10:C01:1::1
------------

IPV6 addressing in R3 are as follows;

R3#sh ipv6 int brief
Serial0/0                  [up/up]
Serial0/1                  [administratively down/down]
Serial0/2                  [administratively down/down]
Serial0/3                  [administratively down/down]
Loopback0                  [up/up]
    FE80::9CD7:2EFF:FEF0:99FA
    FEC0::3:1
Loopback31                 [up/up]
    FE80::9CD7:2EFF:FEF0:99FA
    2002:AC10:1703:31::1
Loopback32                 [up/up]
    FE80::9CD7:2EFF:FEF0:99FA
    2002:AC10:1703:32::1
Tunnel0                    [up/up]
    FE80::AC10:1703
    2002:AC10:1703:1::3

-------------------
IPV6 routing table is as follows;

R3#sh ipv6 route
IPv6 Routing Table - 12 entries
Codes: C - Connected, L - Local, S - Static, R - RIP, B - BGP
       U - Per-user Static route
       I1 - ISIS L1, I2 - ISIS L2, IA - ISIS interarea, IS - ISIS summary
       O - OSPF intra, OI - OSPF inter, OE1 - OSPF ext 1, OE2 - OSPF ext 2
       ON1 - OSPF NSSA ext 1, ON2 - OSPF NSSA ext 2
S   2002::/16 [1/0]
     via ::, Tunnel0
C   2002:AC10:1703:1::/64 [0/0]
     via ::, Tunnel0
L   2002:AC10:1703:1::3/128 [0/0]
     via ::, Tunnel0
C   2002:AC10:1703:31::/64 [0/0]
     via ::, Loopback31
L   2002:AC10:1703:31::1/128 [0/0]
     via ::, Loopback31
C   2002:AC10:1703:32::/64 [0/0]
     via ::, Loopback32
L   2002:AC10:1703:32::1/128 [0/0]
     via ::, Loopback32
L   FE80::/10 [0/0]
     via ::, Null0
S   FEC0::1:0/112 [1/0]
     via 2002:AC10:C01:1::1
C   FEC0::3:0/112 [0/0]
     via ::, Loopback0
L   FEC0::3:1/128 [0/0]
     via ::, Loopback0
L   FF00::/8 [0/0]
     via ::, Null0
--------------------------
Enabling IPv4 EIGRP routing as follows;

router eigrp 1
 network 10.0.0.0
 network 172.16.0.0
 no auto-summary

Virtualization with CentOS and VirtualBox in Window 7

It's difficult to test "Virtualization" if you don't have powerful server.
But, you can test "Virtualization" using Sun Virtual Box.

It means installation CentOS Linux server guest OS inside CentOS virtual machine using VirtualBox.

In short, it's nesting virtual machines using Xen in Virtual Box.  Well, as usual go, browse and search in Internet. Most are not recommend and I'm really interested to test.

The purpose of installation is how CentOS virtualization works with Xen and it's not for production.

So, read on below if you are on the same boat as me.

I am using CentOS 5.5 and install it in Sun VirtualBox. I think this will be easy for you as well. Just download DVD ISO file from www.centos.org using from direct link or torrent.
  • After all CentOS is up and running in VirtualBox, type to following command to install Xen kernel.
  • yum install kernel-xen xen
  • Make sure that "VT-x/AMD-V, Nested Paging, PAE/NX is enabled in virtual machine as in below picture.


  • After successfully installation of Xen kernel, system need to reboot. On reboot, press Enter key when there is boot menu pops up and select "Xen Kernel"
  • To permanently start Xen kernel when system boots up, edit the grub.conf file and select the new kernel in first place.
  • There are two types of virtualization as follows;
  • Full-virtualization: hardware is emulated to the extent that unmodified guest operating systems can run on the virtualization platform. Normally, this means that various hardware devices are emulated.
  • Paravirtualization: in paravirtualization the guest operating system is ported to the hypervisor, a layer sitting between the hardware and virtualized systems. Because this normally doesn't require full device emulation or dynamic recompiling to catch privileged instructions, paravirtualization often performs at a near-native speed.
  • As the lab that I'm going to is going to use Virtual machine, this lab is for "paravirtualization".
  • After installation Xen and upgrade kernel, it's ready to create Xen domain.
  • Create a new Xen guest as follow;
  • virt-install --paravirt --name cent01 --ram 256 --file /vm/cent01.img --file-size 10 --nographic --localtion http://192.168.0.55/pub
  • Before you execute previous command, you have to mount the CentOS image and create as public directory.
  • The reasons is you can't mount virutal machine CD Drive as you are using Virtual Machine and not real hardware.
  • To mount CentOS image as to appear in website, execute the following command
  • mount -o loop /CentOS.iso /var/www/html/pub
  • Make sure to install Apache in your Virutal Machine first and create pub directory.
  • Finally, Xen guest will create and start installation.
  • After complete installation, you can clone the Xen guest as follow.
  • virt-clone --original cent01 --name clonecent01 --file /vm/clonecent01.img
For more information about CentOS virtualization, go and browse at http://www.centos.org/docs/5/html/Virtualization-en-US/

Implementing routing for branch offices and mobile workers

The following labs included the followings to practice all in one.

(1) Configure NAT
(2) Configure IP Sec VPN
(3) Configure GRE tunnel over IPSec
(4) Enabled dynamic routing over a GRE tunnel

Lab topology is as shown in below.


Your organization is expanding it's operation and wants to connect a branch site. To avoid expensive WAN costs, the decision make to use Internet as WAN link. So, you suggest to use IPSec VPN to support all traffic going between two sites. In addition, to have dynamic routing between two sites, implementing Generic Routing Encapsulation (GRE).

For branch office to connect to Internet, lab needs to use NAT from branch office.

If you are interested to practice, download the completed GNS3 lab files from here https://docs.google.com/leaf?id=0B889ogd4ltI2MzBjZmFiMGQtM2NhYi00NmI2LTk5YTktODM3MmNjMDQ5ZjBk&hl=en&authkey=CLH3uNoC


Tuesday, April 12, 2011

Deploying unattendent Firefox 4.0 to all PCs in LAN

For those who would like to deploy Firefox 4.0 (new release) to all network PCs, download http://www.mozilla.com/en-US/firefox/fx/

Extract Firefox 4.0.exe file into folder using 7Zip


After extraction into folder from the EXE file, create batch file as follows;


@echo ***** Installation Firefox 4.0 now ***
@echo off
setup.exe --ms

Script will install Firefox 4.0 silently and update the existing version if necessary. Script can install if even the user opening old Firefox browser. But, update will work after closing current Firefox browser and open


Create network share and place installer file and batch file. Deploy as you wish from remote using Group Policy or using "psexec.exe" if you are not in Domain environment.


Command.com MS DOS black window will display during installation.

If you want to hide MSDOS black window, download "Hidden Start" program from http://www.ntwind.com/software/utilities/hstart.html


After deploying the script, check the add-ons from old firefox and update as necessary. If you can't find updated Add-ons, disable it.

Deploying unattendent installation of Java 6 update 24

For those who would like to deploy latest Java update to all network PC, download latest Java 6 update 24 from http://www.java.com/en/download/manual.jsp


After downading the EXE file, create batch file as follows;


@echo *** Installation Java 6 update 24 ****
@echo off
jre-6u24-windows-i586-s.exe /s /v "/qn IEXPLORER=1 MOZILLA=1 JAVAUPDATE=0 JU=0 REBOOT=Suppress"


Script will install Java sliently and update in "IE" and "Firefox" and automatic update will turn off. If reboot, requires, it won't reboot automatically.


Create network share and place installer file and batch file.

Deploy as you wish from remote using Group Policy or using "psexec.exe" if you are not in Domain environment.


Command.com MS DOS black window will display during installation.

If you want to hide MSDOS black window, download "Hidden Start" program from http://www.ntwind.com/software/utilities/hstart.html


After deploying the script, check whether it has install successfully by browsing to http://www.java.com/en/download/installed.jsp and click "Verify Java Version"